Yamaha YXZ Forums banner

Front Bumper or Winch Mount - Opinions Please

36K views 32 replies 13 participants last post by  dans2017ssse  
#1 ·
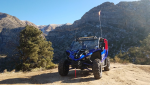
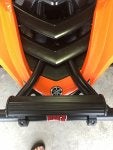
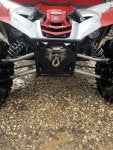
Considering either a OEM front bumper, SuperATV front bumper or just fab up a winch mount.

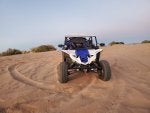
Most of the driving is on maintained trails, open fields, and roads.

Is it worth the cost and effort to mount a brush guard style front bumper both for protection and to mount a winch, or just fab up a winch mount? I'll admit I do like the look of the bumper, just not convinced of the necessity of one.

Opinions please.
Nate
 
#2 ·
I went with the Super ATV for it's coverage of the headlights, as well as a winch mount. It deflects brush and the such out of the way, although I'm not sure it would take a very big impact without compressing. It serves its light duty purpose enough for me while providing a great place (and inexpensive) to mount my winch.
 

Attachments

#4 ·
Thanks Airmed / Rocken Robin

I do like the look. I was hoping it would be heavy duty enough not just to mount a winch but also use as an anchor point for self recovery. One thing I don't like is there aren't any hard points on the frame I'd feel comfortable attaching a line to (think attach a snatch block x2 to increase mechanical advantage).

But Rocken Robin has a very valid point RE increasing nose length and weight contributing to the likelihood of an endo.

I'm really tempted to break out the tools and fab up a lightweight brush guard, but go with a winch mount that puts the winch over the A arms. Still leaves me with finding or making hard points for self recovery.
 
#6 ·
I have winches mounted on both machines and they have come in very handy. Mostly getting them back to rubber side down....lol. One has the OEM trail and the other the OEM desert. I like the protection and look of the trail, but the desert has proven to be a nice lighter weight option too. I think the super ATV version hangs a little low and offers some additional risk to getting into an endo, as pointed out by others. I have no experience with the Weller, but it looks like it offers the tightest option and best clearance.
 
  • Like
Reactions: WWARt
#8 ·
Really appreciate all the input.

For the short term (2 months?). I'm kind of leaning towards going with the OEM trail bumper but mount the winch on a Hauser mount.

Our trails open up on the 15th of March and I'm not sure I'll have the time to fab both and powder coat by then. Oh, and SWMBO gets nervous everytime I pull out either MiG or TiG and say "this will only take a minute...."

I really like the way the CRC bumper mounts. I think once I have the time this summer I'll copy the upper outline of the OEM but use a CRC style mount. At the same time I'll probably add a couple hard points to the sides of the frame. Next winter I'll take the time to add a full gusset kit too.

For today I need to figure out a simple mount on the back for a 8 lb Danforth anchor (that isn't ugly and wont rattle). Probably try and add in a tie down / hard point shackle while I'm at it.

Thanks
Nate
 
#11 ·
not much but gets the job done. Homemade bumper and winch mount 3500lb badlands winch. Made the winch mount out of 1” angle and welded it in the frame above the diff. Had to mount the winch with the bottom facing front of the machine. Fairly easy to get to. Seen the idea somewhere on forums.
 

Attachments

#12 ·
Like that it exists fairly high, less likely to contribute to an endo.

Was looking at the Hauser & Weller. Like the Weller, but also like the simplicity of the Hauser.

One limiting factor for me is access to the machine. Tonight is a perfect example. Spent time building a mount for a Danforth anchor (decided on a roof mount, more accessible when she turns turtle with it).

Come time to install it and I hear the door for her shop open and off she goes. Apparently couldn't resist taking it out in the 12" of new powder we got today.

I'm on the verge of buying a lockout/tagout for the ignition!!
115644

In her defense, she did say she wanted to test drive it since I wired the whips, might change how it handles... facepalm...
 
#13 ·
I love my Super ATV bumper. I ride alot of tighter trails thats somewhat maintained. I actually plowed a deer one night on the way home hitting her about 60 mph an all it did was crack one headlight and knock bumper out of adjustment. (And needed a new pair of shorts) lol. Only downfall is when going down straight drops into creeks and such the nose will drag unless you’re running bigger tires. Im still on stock size. I’ve made it over 7000 miles with it though an still love it other than the occasional scrape.
 
#14 · (Edited)
I admit I prefer the look of the Super ATV bumper, but I think for now I'm going with the OEM trail bumper. I like that it's almost the same profile as the existing grab bar. I think my biggest concern is not lowering the nose too much. The biggest threat is going to be operator inexperience and over confidence. This is her first real off-road machine, her confidence in a helmet, 5 point harness and roll cage can be a bit scary. I've just about mastered the seated fetal position, but the screaming like a school girl I'm still working on.

After looking over the Weller and Houser mounts, plus KYGuy52's mount. I'm thinking I'm going to Fab that up over the weekend. That way when the bumper shows up Monday I can get the whole job turned around quickly.

Hearing you mention deer reminds me that the next item on my "To-Do" list is anti-intrusion bars. Both the trails and the farm we ride on are thick with deer. I really don't want to find out if the YXZ can seat 3. Been very fortunate that in the 23 years we've been here we've only hit one deer. I have friends who average 2 or more a year. Should probably point out thats while driving their normal cars....
Thanks
Nate
 
#16 ·
Looks like my luck has changed. I'll have plenty of time to disassemble, measure and fabricate.

With temps like this she won't be going anywhere!

I dont know how many others run in cold temps, but for us it just doesn't like to start and struggles to run below 10*. So typically we wont leave the barn when its below 15*. That means it's got to warm up another 40* !!sweet!!.
115659
 
#22 ·
A good bumper and winch are the insurance policy you hope you never need! But more than likely will!
I built my own! Not only have I used it to right a couple other people but it has gotten me out of a few bad spots! It will take the brunt of the hit when plowing into some triple G- outs!
A good bumper and winch are the insurance policy you hope you never need! But more than likely will!
I built my own! Not only have I used it to right a couple other people but it has gotten me out of a few bad spots! It will take the brunt of the hit when plowing into some triple G- outs!
 
#23 · (Edited)
So, I built the winch mount this weekend. Took about 2 hours start to finish cost $13.00 in materials.

Later today I'll get some photos and post up the info in case anyone else is intertested in fabricating an easy to build bolt in internal winch mount
 
#24 · (Edited)
So here are the photos and drawing of what I did for the internal winch mount.

I went with a bolt in design both for simplicity and ease of replacement. I also thought that if someone else wanted to fabricate it themselves they could even without a welder. I checked around and most shops would have welded it up for $20.00 - $25.00.

Took about 2 hours to fabricate, fit, weld and install. I went ahead and attached a copy of the plans but if anyone else decides to use this mount you'll want to measure everything first since there are so many variations from frame to frame. The holes for the winch mount bolts are intentionally not dimensioned. Most winches use a standard foot print, but you'll want to adjust where the winch sits on the mount based on where the cable exits, etc.


I used the winch mount plate that came with the winch as an assembly jig to hold the parts so I knew my bolt holes would line up.

The two larger bolts take up most of the force. The two upper bolts really dont take much force. When the winch cable is in tension it forces the mount against the frame reinforcement.

With the mount you have plenty room for vertical adjustement. The higher the winch goes the more room you have for the cable over the front frame section. The lower you go the easier it is to run the cable out high.


Nate
 
#25 · (Edited)
Finished installing the Yamaha trail bumper, internal winch and mount. While I was doing that I decided to add two hard points to the bumper to attach shackle or tow rope to. Since I plan on modifying the bumper in the future to raise the "chin" portion of the bumper I didnt weld the hard points on.

I used a pair of TCS (Tony's Creative Services via Amazon) bolt on shackle mounts. I attached these on either side of the winch fairlead. When I modify the bumper these can be welded in place.

I really only needed the one, but it looked better with two. I plan on using the same mounts when I do the rear shackle/tow point in the furture.


Nate
 
#28 ·
Thanks Dozer. Wish I could take credit for the shackle mounts. Came across them on Amazon for $36.00 and knew I couldn't even come close for that cost. When I got them I was more than pleasantly surprised with just how nicely made they were. fit, finish, everything was perfect on them. Apparently they still make nice stuff in MN! LOL (MN is WI arch enemy in football....)
Thanks!
Nate
 
#29 · (Edited)
I should probably add that I modified the original winch control by mounting a Warn contactor under the hood

Then put an Amphenol connector on the dash by the glovebox.

Swapped out a coiled cord

and a couple momentary contact push button DPST switches.
 
#30 ·
I know this is a dead thread... but that's never stopped me before!

Just a quick follow up.

She stuck it good!

Mud was only knee deep if you went in head first..... yeah about 48" of think goo. Made it probably 50 yards, but got stuck 20 yards shy of solid ground. Was able to winch within about 10 yards. Fortunately a passerby hooked on with his winch and helped pull while I used mine to hold it upright.

The internal mount held nicely. The front bumper actually flexed up about 2" from the pressure of the winch fairlead and cable.

So glad I spent the time and effort. From stuck to rolling was probably 30 minutes.
 
  • Like
Reactions: z28roc
#31 ·
So, once again reviving really dead posts.


She went back. Sole intent was getting through the mud that stuck her last time. This time she took a girlfriend who loves mud.

Mud hole starts at 1:00 goes to 1:30.

But. If you want to see how the wrong seat should be reacting. Jump to about 2:30. I swear she looks like a toddler on sugar cubes. ROFLMAO